
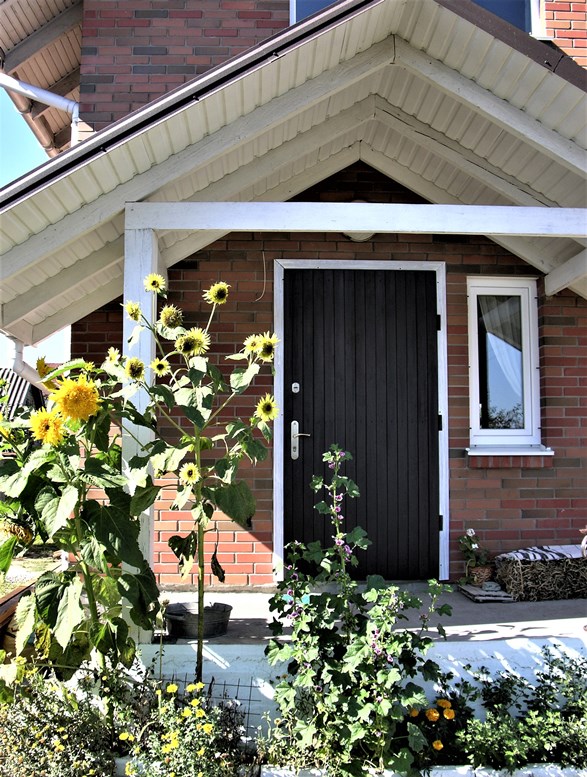
Wood plays an essential part in our house construction and specially design. Wooden kitchen countertops, wooden beams, lights, stairs and the entry door is not an exception here.
I`ve always wanted to have wooden entry doors, but haven`t planned out the practical part of the matter. We don`t have any separated boot room – from the open porch you get right into a small (and cosy 🙂 ) hallway. So, a simple wooden door leaf wouldn`t be enough for the cold and windy winters. But still, the wooden door was favoured.
Insulated steel door covered with solid wood
A good solution came fast. While surfing the internet I found a local door company that makes steel doors covered with tongue and groove hardwood boards. The doors are the simplest polyurethane insulated steel doors covered by natural wood on both sides. They are heavy, solid and wooden. But. . . the company supplies it only in . . . putting it mildly – an unappealing red colour – some red stain. Since they had been installed my only dream was to paint them white – my favourite interior/exterior colour.

For whole three years every time I passed through this door I was thinking “When am I going to paint it at last?!” And, by a happy chance, when no one was home, I opened a can of a very old stain which was lying around for years and just painted that door!
How to fix dried-out oil-based paint
Old oil-based stains and paints can be used after their expiration date. In fact, they can be used till the whole substance doesn’t get hardened. If there`s a lot of paint in the can, it`s likely to be still fluid under that skin.
So, just remove the skin (I usually use bamboo chopsticks for this purpose), scrap the oil from it back into the can and stir the paint with the same stick.
If the substance is too viscous, then pour some paint thinner to make it more applicable.
The resulting paint would not have all the properties of the fresh paint, but if you apply several coats it will still work well.
*Important! Never dump old paint into a public dumpster or trash bin. Please, check with your local authorities and your local waste disposal service provider on rules and regulations applicable to your area.
How to paint a wooden door easily
First, if there`s a trim around the door – remove it.
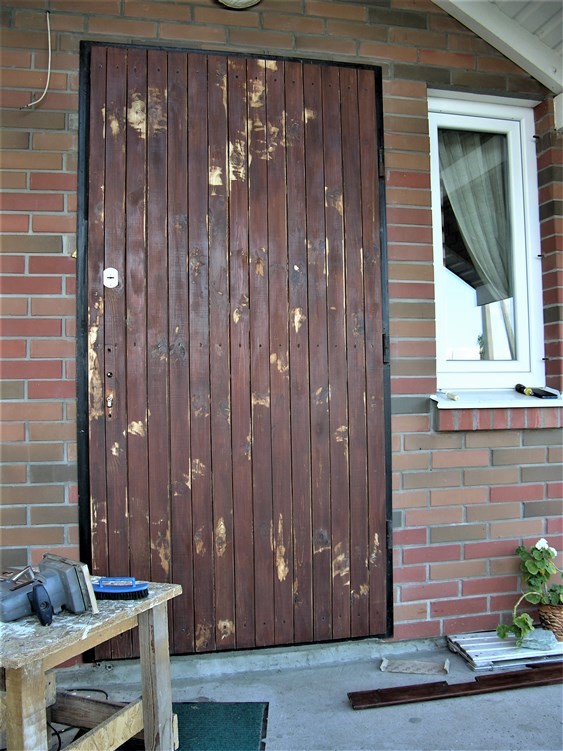
If it is possible, remove the door from the hinges. It is much easier to make any manipulations when the surface is in horizontal position, sat on padded sawhorses, for example. I couldn`t remove mine, because of its weight, it is too heavy.
Remove the hardware
At first, I removed the door lever and the handle & cylinder escutcheon of the bottom lock. Couldn`t remove the top lock front plate because it is attached with rivets (the masking tape or neat painting, as in my case, will do here).
Sand the flats
*Important! Take care of safety. Safety goggle and a dust mask is a must if you`re going to sand the surface.
Then I tried to give the door a little sanding. . .
First of all it`s a bit tough work to sand vertical surfaces. Secondly, there are groves between the boards, and I couldn’t make up anything to remove the stain off the grooved surface. I could`ve use a small, razor-sharp scraper to scrap off the stain, but it seemed to be a lot of work, and I had only one day to accomplish it. So, using a sanding sponge, I manually sanded the groves between the boards just to make them smooth.
On the rest flat surface, where the weather and time had left their traces, where some sap had come out, and some grime had accumulated, I applied the angle grinder with a 100 grit disc. And then applied the finishing sander with 120 grit paper to the whole surface, just to make it smoother.
After cleaning the dust away with a cleaning brush, the door was ready for painting.
Looked like this:
Staining the door
I used a simple paint brush. To be frank, don`t know how many coats there are on the door. There are two coats for sure, but I wanted to use the whole paint in the can, and to make some distressed look, so, chaotically made brush strokes there and there (only vertically). And I`m really satisfied with the result.
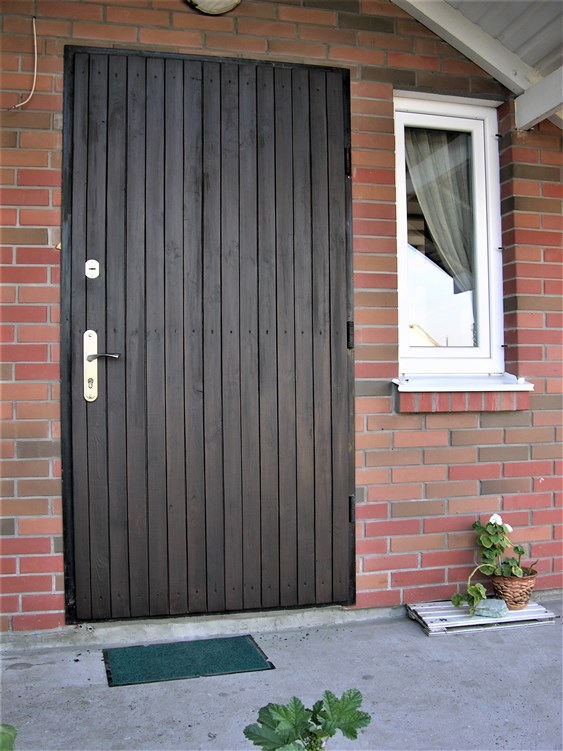
I can still see the wood grain, but there`s no obvious track of repainting the door. I think that is because this stain is much darker than the previous red one.
If you`ve been following my projects for some time, then you might have noticed that I follow the “contrast” concept. So, to distinguish the dark door from the dark wall, I painted the trim white.

And finally, put the trim and the hardware back on their place.
Exterior wood door refinishing can be a tricky job along with all the DIY projects. But who gets a positive result without trying? 😉
Got your own front-door facelift story? Spill the paint — I’m all ears (and brushes)! Drop your epic refinishing adventures below!
